Best bobber stopper setup for suspending bait
Oh, the age-old dilemma of getting your bait to hang just right in the water column! We've all been there, staring at our bobber, wondering if our shiner is cruising at the ideal depth or if it's dragging along the bottom, completely missing that suspended school of crappie or those elusive lake trout. It's a frustrating dance, especially when you know the fish are there, but your presentation just isn't cutting it. This guide is all about simplifying that process, showing you how to set up the best bobber stopper rig so your bait is always exactly where it needs to be, increasing your chances of a successful day on the beautiful waters of New Hampshire.
Understanding the Challenge of Suspending Bait
Fishing isn't always about casting to the bottom or tossing a lure on topwater. Often, the fish you're after, whether it's a school of panfish, a cruising smallmouth bass, or even certain trout species, are suspended somewhere in the middle of the water column. They might be holding just above a weed line, suspended over a deep drop-off, or simply cruising at a certain depth due to water temperature or baitfish location. Getting your bait into that specific zone, and keeping it there, is where the challenge—and the bobber stopper—comes in.
Why Suspending Bait Matters in New Hampshire
Think about fishing on Lake Winnipesaukee for smallmouth bass. Sometimes those bronze backs are hugging the rocky bottom structure, but just as often, especially during certain times of the year, they might be suspended off points or over submerged humps, actively chasing schools of smelt. If your bait is always hitting the bottom, you're missing a huge portion of the water these fish are using. The same goes for crappie in quieter ponds; they love to hang out around submerged brush piles or timber, and precisely presenting a small jig or minnow at their eye level can make all the difference. Knowing how to present your bait precisely at these suspended depths is a game-changer for many New Hampshire species. It’s a skill that elevates your angling from merely fishing to effectively hunting.
Consider a hot summer day on Pawtuckaway Lake, where the largemouth bass might retreat to deeper, cooler water but still suspend around cover, rather than being glued to the bottom. A properly rigged suspended bait can drift naturally into their zone, looking like an easy meal. Or imagine trying to catch yellow perch in Lake Winnisquam, which often school up and suspend in open water. Without a way to consistently hit that specific depth, you're effectively casting blind. The ability to control your bait's depth with precision is not just a convenience; it's often the key to unlocking consistent success in diverse New Hampshire fishing scenarios.
Common Frustrations with Traditional Bobber Setups
Many of us started fishing with those classic red-and-white clip-on bobbers. They're great for simplicity, but when you need to fish deeper than a few feet, they become a real headache. You can't cast them far without them flopping around, and trying to reel in a fixed bobber that's set to eight feet deep means having eight feet of line dangling from your rod tip, making landing a fish or recasting nearly impossible. It's a logistical nightmare that often leads to tangled lines, frustration, and ultimately, giving up on deep suspension fishing.
Another common frustration arises when the bobber stopper itself isn't reliable. Maybe it's a cheap plastic stopper that slides easily under the pressure of a cast or a strong current, causing your bait to drift deeper than intended. Or perhaps it's a string stopper that's tied improperly and constantly slips, forcing you to re-adjust your depth every few minutes. These minor annoyances quickly add up, turning a relaxing day on the water into a constant battle with your gear. It's truly disheartening to feel a bite, only to realize your bait was nowhere near the depth you thought it was. A reliable setup is the foundation of confidence, and confidence catches fish.
Components of an Effective Bobber Stopper Setup
To truly master suspended bait fishing, you need to understand the individual pieces that make up a successful bobber stopper rig. It's more than just a bobber and a hook; it's a coordinated system designed for precision and reliability. Each component plays a vital role in ensuring your bait is presented perfectly to the fish. Getting these components right can make the difference between a frustrating day and a rewarding one, especially when you're targeting specific depths for particular species in New Hampshire's varied waters.
The Bobber Stopper Itself: Types and Materials
The bobber stopper is the unsung hero of this rig. It's a small but critical piece that allows your line to slide freely through the bobber when casting, but then "stops" at a pre-set depth once it hits the water. There are primarily three types you'll encounter:
- String Bobber Stoppers: These are usually made of a sturdy, thin string (often braided or waxed) that you tie onto your main line. They're highly adjustable, grip the line well, and can easily pass through rod guides and reel bail systems. The knot can be a bit tricky to tie initially, but once you get the hang of it, they offer excellent depth control. Many anglers prefer these for their reliability and adjustability, especially when fishing very deep waters where precision is paramount. You can find pre-tied string stoppers in small tubes for easy application at most tackle shops, including large retailers like Bass Pro Shops.
- Plastic Bobber Stoppers: These are small, usually cylindrical or oval pieces of plastic that have a hole through the middle. They come with a small wire loop that you thread your main line through, then slide the plastic piece off the loop onto your line. They're super easy and quick to apply, making them a popular choice for beginners or when you need to change depths frequently. However, some cheaper versions can slip on thinner lines or under heavy casting, which can be incredibly frustrating. They are also usually a bit bulkier than string stoppers, making them slightly less smooth through rod guides.
- Rubber Bobber Stoppers: Similar to plastic, these are usually small, soft rubber beads or cylinders. They offer a good grip on the line and are generally quite durable. Like plastic stoppers, they often come on a wire loop for easy threading. They tend to be a little more secure than plastic stoppers on average, especially on varying line diameters, and are less likely to damage your line. The softer material also means they pass through guides a bit more smoothly than hard plastic, though not quite as seamlessly as a well-tied string knot.
When choosing, consider your line type and diameter. A stopper that's too loose will slip, and one that's too tight can weaken your line. It's often a good idea to have a few different types on hand for versatility.
Choosing the Right Bobber for Your Bait
Not all bobbers are created equal, and for a bobber stopper rig, you almost exclusively want a slip bobber. A slip bobber has a hole or a small tube running through its center, allowing your main line to "slip" through it until it hits the bobber stopper. This design is crucial because it lets you reel in your line all the way, making casting much easier, even when your bait is set to a deep depth.
Here are the main types of slip bobbers and what to look for:
- Balsa Wood Slip Bobbers: These are highly sensitive, often used for lighter presentations where you need to detect subtle bites. Their natural buoyancy and light weight make them excellent for panfish or wary trout. They usually have a thin, weighted stem that helps them stand up straight in the water, providing clear bite indication.
- Foam Slip Bobbers: More durable and often less expensive than balsa, foam bobbers come in a huge variety of shapes and sizes. They might not be quite as sensitive as balsa, but they're still very effective. They're a good all-around choice for many types of fish, from crappie to bass. Some foam bobbers are weighted at the bottom, which helps them cast further and stand upright more quickly.
- Weighted Slip Bobbers: Many slip bobbers, regardless of material, come with a fixed weight at the bottom. This weighting helps with longer casts, stability in windy conditions, and ensures the bobber sits upright instantly after splashdown. This is particularly helpful when you're casting across a wider area on a larger lake like Squam Lake, trying to reach a suspended school of fish.
When selecting a bobber, consider the size of your bait and the weight you'll be using. The bobber needs to be buoyant enough to support your bait, sinkers, and still provide clear bite detection. A bobber that's too large will be harder to pull under by a light biting fish, while one that's too small might sink too easily. If you're using larger live shiners for bass, you'll need a bigger bobber than if you're using a tiny beetle spin for panfish.
Selecting Appropriate Weights and Hooks
The right weight and hook are just as critical as your bobber and stopper for proper bait suspension. These elements dictate how your bait sinks, how it behaves in the water, and how effectively you hook a fish. This isn't just about getting it to sink; it's about controlling its descent and maintaining its position.
Weights (Sinkers):
Your choice of sinker depends on several factors: the size of your bait, the desired sink rate, and current conditions.
- Split Shot: These are small, round weights that pinch onto your line. They're incredibly versatile, allowing you to add just a little bit of weight or string several together for more. They're excellent for finesse presentations, especially with live bait like small minnows or worms, allowing for a natural, slower fall. For trout fishing in calmer waters or for Panfish Fishing in New Hampshire, a few small split shot can be perfect. Just be careful not to crimp them too hard, which can weaken your line.
- Bullet Weights or Egg Sinkers: These are typically used for bottom fishing rigs, but lighter versions can be used above a swivel for suspending larger baits in deeper, perhaps slightly current-prone areas. They offer a more streamlined cast and fall quicker than multiple split shot. If you're fishing a deep channel in the Merrimack River where some current is present, a smaller egg sinker might be needed to keep your bait down.
- Slip Sinkers: Most of the time, your weight will be a 'slip' style, meaning it slides freely on your main line below the bobber and above your hook or swivel. This design allows the fish to pull the bait without immediately feeling the full resistance of the sinker, giving you a better chance to set the hook. This is especially important for wary fish.
Hooks:
The hook needs to be appropriately sized for your bait and target species.
- Baitholder Hooks: These have small barbs on the shank to help keep soft baits like worms or PowerBait from sliding off. They're great for holding a nightcrawler for a big brown trout in one of New Hampshire's stocked ponds.
- Aberdeen Hooks: These have a thin wire construction, which is perfect for live bait like minnows. The thin wire is less likely to kill your bait, keeping it lively longer. Their wide gap also provides a good hook-up ratio, especially for panfish.
- Circle Hooks: If you're practicing catch and release, especially for larger species, circle hooks are fantastic. They are designed to hook fish in the corner of the mouth, minimizing deep hooking and making de-hooking much easier and safer for the fish. Always check New Hampshire Fishing Regulations Explained for specific rules regarding hook types and barbs.
- Jig Heads: When suspending soft plastics or small live minnows for crappie, a small jig head can serve as both your weight and hook, offering a compact and effective presentation. This is a common and highly effective method for crappie in New Hampshire.
The key is to use just enough weight to get your bait down to the desired depth and keep your bobber standing upright, but not so much that it looks unnatural or immediately sinks your bobber. A balanced setup ensures a subtle presentation that entices even the most finicky New Hampshire fish.
Step-by-Step Guide to Rigging Your Setup
Alright, now that we've covered the individual components, let's put it all together. Rigging a bobber stopper setup correctly can feel a little fiddly at first, but with a bit of practice, it becomes second nature. This method will save you endless frustration on the water and dramatically improve your ability to target suspended fish. Whether you're a seasoned angler or a Best Rod and Reel Combo for Beginners, mastering this rig is a fundamental skill.
Attaching the Stopper and Bobber
This is where the magic begins, allowing you to set your depth with precision.
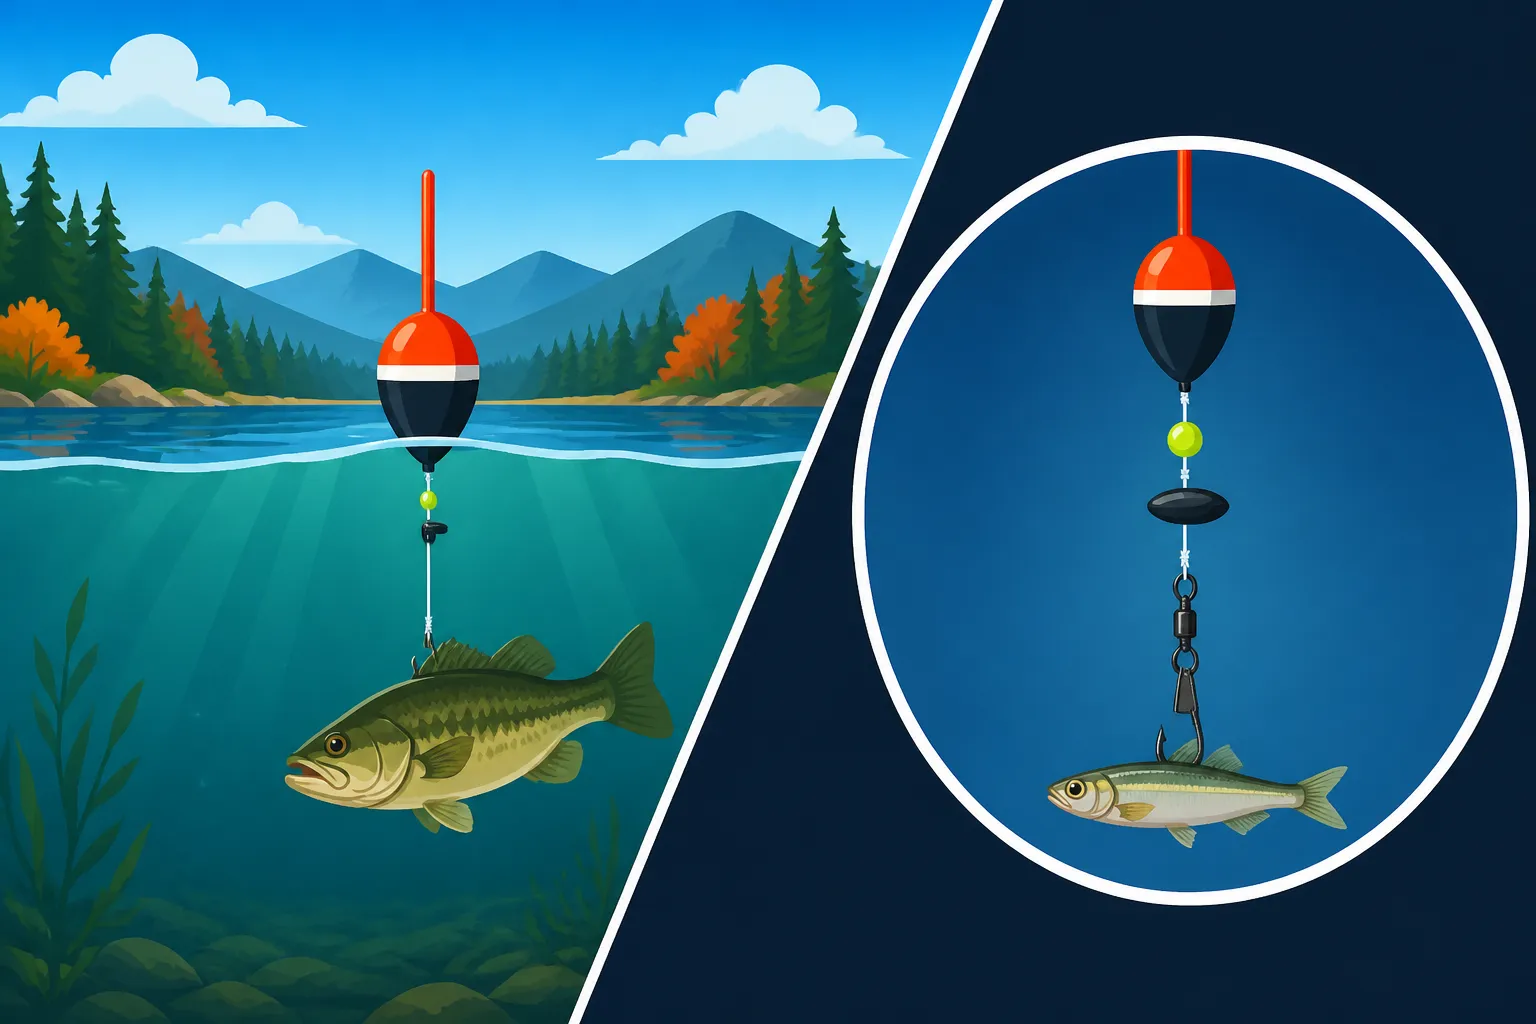
- Thread the Bobber Stopper: If you're using a string stopper that comes in a small plastic sleeve, thread your main line through the sleeve. Then, slide the string knot off the sleeve and onto your main line. Gently pull the ends of the string to tighten the knot onto your line. If you're using a plastic or rubber stopper on a wire loop, thread your main line through the loop, then slide the stopper directly onto your main line from the loop. Ensure the stopper is snug but doesn't pinch your line. This is the first, crucial step in controlling your depth.
- Add a Bead (Optional but Recommended): Immediately below your bobber stopper, slide a small plastic or glass bead onto your main line. This bead acts as a buffer between the stopper and the bobber, preventing the stopper from getting pulled into the bobber's eyelet, which could cause it to stick or even allow the line to slip. It's a small detail, but it prevents a lot of headaches, especially after a long day of casting.
- Thread the Slip Bobber: Now, thread your main line through the center of your chosen slip bobber. If your bobber has a spring clip or a small eyelet at the bottom, ensure the line goes through freely. The line should be able to slide easily through the bobber. This is what makes it a "slip" bobber, allowing your line to run freely until it meets the stopper.
- Add Another Bead (Optional): Similar to the top bead, you can add another small bead below the bobber. This bead will cushion the knot you tie next and can help protect the bobber if it has a sharp edge. It's not strictly necessary for all bobbers, but it's a good habit for added security and longevity of your rig.
Once these components are on your line, you can slide your bobber stopper up or down to adjust your fishing depth. Before adding your hook and weight, it's a good idea to test the stopper's grip by pulling gently on the line from both directions. It should hold firm.
Adding Weight and Hook for Perfect Presentation
With your stopper and bobber in place, it’s time to complete the business end of the rig – the part that actually gets the bait to the fish. This step is about balance and ensuring your bait looks as natural as possible.
- Tie on a Swivel (Recommended): Below your slip bobber (and the optional second bead), tie on a small barrel swivel. The swivel serves multiple purposes: it prevents line twist, especially with live bait that might spin; it provides a connection point for your leader and hook; and it creates a defined "stop" for your sinkers if you're using slip sinkers. A small, black swivel is often best to be less visible to the fish. This creates a break in your line and can also help with potential tangles, especially when you are casting longer distances.
- Attach Your Leader: From the other end of the swivel, tie on a leader line. This can be the same pound test as your main line, or a lighter fluorocarbon leader for increased stealth, especially when fishing clear waters for wary species like landlocked salmon. The length of your leader can vary, but typically 12-24 inches is a good starting point. A longer leader allows your bait to swim more freely and naturally.
- Add Your Weights: If you're using split shot, pinch them onto your leader line, starting about 6-12 inches above your hook. Add enough weight so that your bobber stands upright but still has enough buoyancy to detect a bite. You want your bobber to sit at a pleasant angle, not completely submerged, but not riding too high either. For lighter jig heads or soft plastics, you might not need additional weight, as the jig head provides enough. The amount of weight is often a trial-and-error process, influenced by the size of your bait and the bobber's buoyancy.
- Tie on Your Hook: Finally, tie your chosen hook to the end of your leader. Ensure the knot is strong and secure. Now you're ready to bait up! Remember to double-check all your knots before casting, especially after adding weight, as any weakness can lead to a lost fish. Using good quality fishing line, readily available at stores like Amazon, will also contribute to the overall strength of your setup.
Troubleshooting Common Issues
Even with the best intentions, things can go wrong on the water. Knowing how to quickly troubleshoot common bobber stopper issues will save you time and frustration.
- Slipping Stopper: This is probably the most common headache. If your bobber stopper keeps sliding up or down your line, it's not gripping properly.
- Solution 1 (String Stoppers): Try re-tying the knot, making it a bit tighter. Sometimes using a slightly different knot, or even wrapping the string an extra time around the line before tightening, can help. Ensure the string is snug.
- Solution 2 (Plastic/Rubber Stoppers): Your line might be too thin for the stopper's internal diameter. Try a larger size stopper, or if you're stuck, you can sometimes double your line through the stopper for a tighter fit (though this isn't ideal for casting). Quality stoppers from reputable brands are less likely to slip. If you purchased a multi-pack, try a different stopper from the batch, as manufacturing variations can occur.
- Solution 3 (Line Type): Monofilament lines tend to be more prone to slipping than fluorocarbon or braided lines, which have more friction. If you're consistently having issues, consider switching to a different line type if feasible for your fishing.
- Tangled Line Around Bobber: This often happens during the cast, especially with longer leaders or light baits.
- Solution 1 (Casting Technique): Try a smoother, more controlled casting motion. Avoid jerky or overpowering casts. Let the weight of your bait and sinkers load the rod properly.
- Solution 2 (Leader Length/Weight): Shorten your leader slightly or add a little more weight near the hook to help the rig fly straighter. Sometimes, simply moving a split shot closer to the hook can help everything extend properly during the cast.
- Solution 3 (Swivel): Ensure you're using a quality swivel. A faulty swivel can cause line twist, leading to tangles. You can also try a slightly heavier swivel if your current one isn't helping to keep the leader straight.
- Bobber Not Standing Upright: If your bobber is lying flat or partially submerged, it means you don't have enough weight.
- Solution: Add more split shot or a heavier sinker until the bobber sits correctly. You want just the tip, or a clear indicator portion, visible above the water. A good rule of thumb is to add just enough weight so that a light tap will send the bobber completely under the surface, making light bites easier to detect.
- Difficulty Getting Stopper Through Guides: If your string stopper knot is too bulky, it can snag on your rod guides.
- Solution: Ensure you're using a compact knot, and that the string isn't excessively long. Some anglers prefer smaller, more streamlined stoppers specifically for rods with smaller guides. This is less of an issue with larger, heavy-action rods but can be a real pain on light action or ultra-light gear.
Addressing these issues promptly will keep you fishing effectively and enjoying your time on the water instead of constantly re-rigging.
Advanced Tips for New Hampshire Anglers
Once you've mastered the basic bobber stopper setup, there are always ways to refine your technique and gear to become an even more effective angler in the diverse waters of New Hampshire. Thinking about the nuances of species, water conditions, and even how you store your gear can make a significant impact on your success rate.
Matching Your Setup to Target Species and Water Conditions
The beauty of the bobber stopper rig is its versatility, but optimizing it for specific situations will make you much more successful. You wouldn't use the same setup for a timid brook trout in a clear mountain stream as you would for an aggressive smallmouth in a deep lake.
- For Panfish (Crappie, Perch, Bluegill): These fish often suspend in schools around structure. Use a very sensitive balsa or small weighted foam slip bobber. Keep your bait light – a small minnow, worm, or tiny jig on a small Aberdeen or jig hook. A single small split shot is often all the weight you need. Precision is key here, so ensure your bobber stopper is holding firm. This setup is ideal for targeting crappie suspended around brush piles in Pawtuckaway Lake or yellow perch schooling up on Winnisquam. Check out Best Tackle for Panfish for more specific gear advice.
- For Trout (Stocked Ponds & Lakes): When trout are stocked, they often mill around at various depths before settling. A bobber stopper rig allows you to easily find their preferred depth. Use a medium-sized, sensitive slip bobber with PowerBait, corn, or a small worm. A baitholder hook and enough split shot to balance the bobber are perfect. For those elusive holdover trout, you might need an extra long leader and lighter fluorocarbon to fool them. This is especially true in clearer waters or heavily fished areas after New Hampshire Trout Stocking and Fishing Rules events.
- For Smallmouth and Largemouth Bass: Especially during summer, bass will suspend over structure or bait schools. Use a more robust slip bobber, often a weighted foam type, capable of supporting a larger live shiner, crayfish, or a soft plastic jerkbait. A heavier bullet weight or a few larger split shots might be needed to get the bait down quickly. Consider a medium-sized circle hook or a strong wide-gap hook. If you're targeting smallmouth on Lake Winnipesaukee, having the ability to suspend a shiner just above a deep drop-off can be incredibly effective. Understanding How to Catch Smallmouth Bass in New Hampshire Lakes often involves mastering these suspended presentations.
- For Landlocked Salmon and Lake Trout: These deep-water predators are often found suspended in large lakes like Sunapee or Winnipesaukee. While trolling is popular, a stationary or drifting bobber stopper rig can also be effective, especially if you're targeting a known depth range. Use a larger, more buoyant slip bobber that can handle a substantial live smelt or shiner. You'll need more weight, perhaps an egg sinker above a swivel, to get your bait down to 20-40 feet or more. A sturdy, sharp hook appropriate for a large fish is crucial. Understanding the depths these fish prefer, often around schools of Rainbow Smelt as Forage Fish in New Hampshire Lakes, is key.
Water Conditions:
- Clear Water: Opt for lighter fluorocarbon leaders, smaller hooks, and less visible bobber stoppers (e.g., clear plastic or a subtly tied string knot).
- Murky Water: Visibility is less of a concern, so you can use slightly heavier components. However, contrast in your bobber color might help you see it better.
- Windy Conditions: Weighted slip bobbers will perform better, resisting being blown around. A more secure bobber stopper (like a tight string knot) is also essential to prevent depth slippage from the constant pulling of the wind on your line.
Maintaining and Storing Your Bobber Stopper Rigs
Proper maintenance and storage can prolong the life of your gear and ensure your rigs are ready to go when you hit the water. It also helps prevent frustrating tangles when you're trying to set up quickly.
- Clean Your Components: After each trip, especially if fishing in saltwater (like Great Bay for striped bass, though bobber stoppers are less common there), rinse your bobbers, swivels, and any reusable plastic/rubber stoppers with fresh water. This removes salt, grime, and fish slime, preventing corrosion and extending their lifespan.
- Inspect Your Stoppers: Before each outing, check your bobber stoppers. If you use string stoppers, ensure the knot is still tight and not frayed. If it looks worn, replace it. Plastic and rubber stoppers can become brittle over time or lose their grip; replace them if they feel loose or slide too easily on your line. A fresh, reliable stopper is worth its weight in gold. You can buy bulk packs of these small but mighty accessories, often found on Amazon, to ensure you always have spares.
- Organize Your Rigs: Instead of just tossing your rod with a bobber stopper rig still attached into your car, take a moment to secure it. You can slide the bobber down to your hook, wrap the line around the bobber a few times, and secure the hook. Better yet, pre-tie several leaders with different hook and weight combinations and store them in small plastic bags or on leader wheels in your tackle box. This way, if you snap off a rig, you can quickly tie on a new one. A well-organized Best Tackle Box Setup for New Hampshire Anglers will always include sections for pre-tied leaders and various bobber components.
- Protect Your Bobbers: While sturdy, bobbers can get crushed or cracked if not stored properly. Keep them in a separate compartment of your tackle box or a dedicated plastic container to prevent damage. This is especially true for delicate balsa wood bobbers.
By taking a few extra minutes for maintenance and organization, you ensure that your bobber stopper setup is always ready for action, allowing you to focus on the fish and enjoy the serene beauty of New Hampshire's waterways.
| Bobber Stopper Type | Pros | Cons | Best Use Cases |
|---|---|---|---|
| String Knot | Highly adjustable; excellent grip; smooth through guides; customizable knot size. | Can be tricky to tie for beginners; may fray over time; requires re-tying to replace. | Deep water fishing; clear line for wary fish; when precision depth is paramount. |
| Rubber Bead | Easy to apply; good grip on various line sizes; durable; relatively smooth through guides. | Can slip on very thin or slick lines; slightly less adjustable than string; can deform over time. | General purpose; frequent depth changes; beginners; all-around lake and pond fishing. |
| Plastic Cylinder | Very easy to apply quickly; often inexpensive. | Prone to slipping on thin lines; less durable than rubber; can be bulky through guides; may damage line if pulled too tight. | Quick setup; temporary use; panfishing in shallower waters. |
With the right bobber stopper setup, you're no longer guessing where your bait is. You're putting it exactly in the strike zone, increasing your chances of success and making your fishing experience much more enjoyable. Whether you're chasing crappie in a local pond or trying to tempt a trophy smallmouth in one of the Best Fishing Lakes in New Hampshire, mastering this technique will pay dividends. So next time you're heading out, take a moment to properly rig your bobber stopper and fish with confidence.
Disclaimer
This article is for general informational purposes only and does not constitute professional advice. Laws, prices and regulations vary by location and change over time. Consult a qualified professional for guidance on your specific situation.