Best kayak anchor trolley system
Many New Hampshire kayak anglers share a common frustration: the constant battle against wind and current that pushes them off their perfectly chosen fishing spots. It's truly disheartening to finally locate that prime bass hideout or trout eddy, only to find yourself drifting away moments later, forced to paddle back and restart the process. This guide is here to solve that exact problem, diving deep into the world of kayak anchor trolley systems to show you how to maintain your position, fish more effectively, and ultimately enjoy your time on the water, whether you're on a tranquil pond or a broad lake.
Understanding Why You Need a Kayak Anchor Trolley System
If you've spent any significant time fishing from a kayak in New Hampshire, you know the scenario all too well. You paddle into a promising cove on Lake Winnipesaukee, spot some promising structure, drop your anchor, and feel a momentary sense of accomplishment. Then, a light breeze picks up, or a subtle current from a feeder stream starts to pull your bow or stern, rotating your kayak until you're facing completely the wrong direction. Your carefully planned casting angles are ruined, and you're left scrambling to adjust, often spooking the very fish you were trying to catch.
The Struggle of Staying Put on the Water
Imagine you're trying to work a weed line for largemouth bass on Pawtuckaway Lake. Without an anchor trolley, you'd typically drop your anchor off the bow or stern. But what if the wind shifts, or you want to cast to a different part of the weed bed that's now directly behind you? You'd have to pull up your anchor, paddle to a new spot, redeploy, and hope the current or wind doesn't mess with you again. This cycle is not only exhausting but also incredibly inefficient, taking away precious fishing time. It makes it nearly impossible to thoroughly dissect a piece of structure or drift-fish a specific run in a river like the Contoocook. You end up spending more time navigating than actually fishing, which is certainly not what you signed up for when you hit the water.
This frustration is particularly acute on larger, more exposed waters where wind can be a major factor, or in river systems where even a gentle flow can quickly pull you downstream. A fixed anchor point simply doesn't offer the flexibility needed for dynamic fishing situations. You're either too far from the action, or constantly fighting your position, which detracts from the whole experience. It's about taking control of your vessel so you can focus on the fishing, not the paddling or re-anchoring.
Maximizing Your Casting Lanes and Presentation
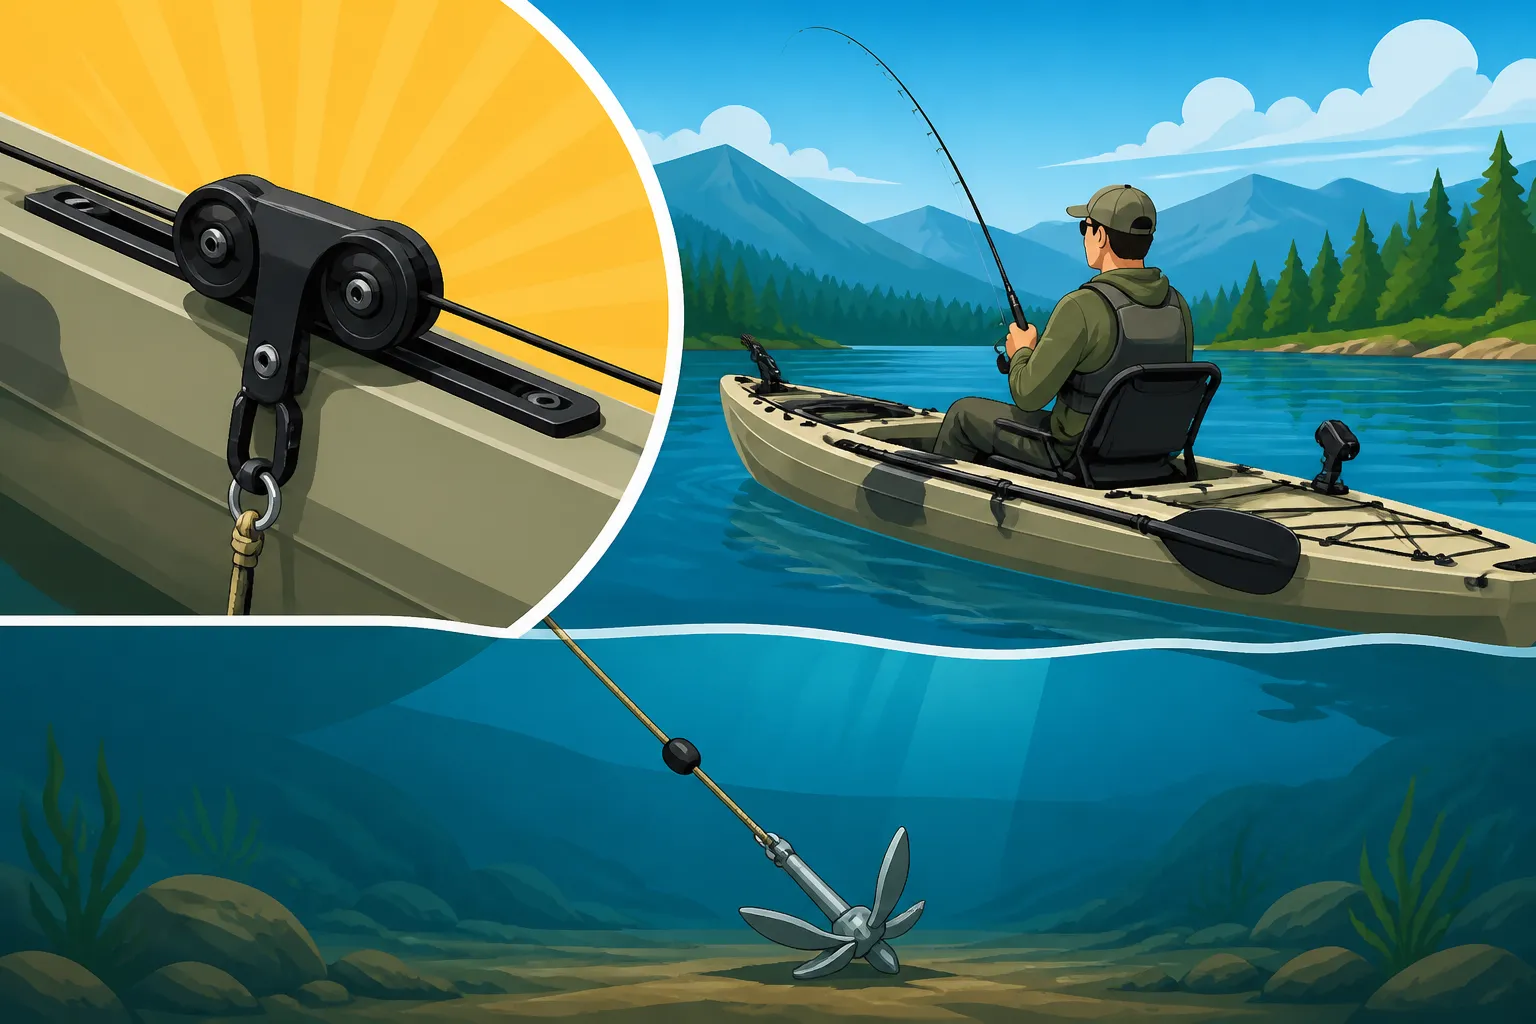
A kayak anchor trolley system is a game-changer because it allows you to reposition your anchor point along the full length of your kayak with just a simple pull of a line, all while your anchor remains deployed. Think of it this way: instead of your anchor being stuck at the very bow or stern, it can be anywhere in between. This means you can keep your kayak perfectly aligned with your target, whether you're casting to a specific log, working a shoreline, or trying to present a fly in a precise current seam.
For example, if you're Fly Fishing for Trout in New Hampshire on a river, being able to pivot your kayak slightly to hit different eddies or riffles without lifting anchor is invaluable. Similarly, when you're targeting smallmouth bass on a rocky point, a trolley lets you cast into the ideal strike zone from multiple angles, maximizing your lure presentation and ensuring you're covering the water effectively. It transforms your kayak from a floating platform that's at the mercy of the elements into a precision fishing machine, giving you the edge you need to catch more fish. Being able to subtly shift your angle allows you to present your bait or lure more naturally, increasing your chances of a strike rather than constantly battling your boat's orientation.
Components of a Kayak Anchor Trolley System
Understanding the individual pieces that make up an anchor trolley system is key to both choosing the right one and installing it correctly. While the concept is simple – moving your anchor point – the reliability and ease of use depend entirely on the quality and configuration of its components. Think of it as a small, yet mighty, pulley system designed specifically for your kayak.
The Pulley System: Smooth Sailing for Your Anchor Line
At the heart of any anchor trolley are the pulleys themselves. Typically, you'll have two pulleys: one at the bow and one at the stern of your kayak. These pulleys are what allow a continuous loop of line, often called the trolley line, to run from one end of your kayak to the other. When you pull this trolley line, the anchor ring (which holds your actual anchor) moves along it, effectively shifting where your anchor is connected to your kayak.
The quality of these pulleys matters immensely. Cheap plastic pulleys can bind, fray your line, or even break under stress. Look for pulleys made from durable materials like marine-grade stainless steel or strong nylon with smooth, corrosion-resistant bearings. This ensures that the trolley line runs freely and smoothly, making adjustments effortless even when there's tension on your anchor line from the wind or current. A smooth operating system reduces wear and tear on your ropes and hardware, and more importantly, allows you to make quick, silent adjustments without spooking fish.
The Anchor Line and Anchor Cleat: Your Connection to the Bottom
While not strictly part of the trolley system itself, the anchor line and anchor cleat are essential for its operation. Your anchor line is the rope that runs from your anchor to the anchor ring on the trolley. The length and strength of this line will depend on the depth of the water you typically fish and the size of your anchor. For general New Hampshire freshwater fishing, a sturdy braided nylon or polyester line is usually sufficient, offering good knot strength and abrasion resistance.
The anchor cleat is crucial for securing your anchor line once you've deployed your anchor and adjusted its position via the trolley. There are various types, from simple zig-zag cleats to H-cleats, which allow for quick and secure tying off of your anchor line. Placement of this cleat is important; it should be within easy reach from your seated fishing position. Some anglers prefer to mount their cleat on the side of the kayak directly opposite the anchor trolley, or in the cockpit itself for ultimate convenience. This allows you to deploy and retrieve your anchor, then quickly secure the line without fumbling, especially when dealing with a feisty fish on the end of your line.
Rings, Stops, and Hardware: The Little Things That Make a Big Difference
Beyond the pulleys and cleats, several smaller pieces of hardware complete the anchor trolley system. The anchor ring is a crucial component; this is the ring that moves along your trolley line, and your actual anchor line clips onto it. Often, a large stainless steel ring or a specialized anchor quick-release ring is used. For quick attachment and detachment of your anchor line to this ring, a pigtail clip or carabiner works perfectly.
To guide the trolley line and secure the pulleys to your kayak, pad eyes or deck loops are typically used. These are small, sturdy attachment points mounted flush to the kayak's deck. You'll need enough of these to create a clear path for the trolley line from bow to stern, ensuring it stays close to the kayak's hull and out of the way of your paddle stroke. Additionally, some systems incorporate small line stops (often small beads or knots) on the trolley line to prevent the anchor ring from sliding too far, or a small section of shock cord or bungee to keep tension on the trolley line when not in use, preventing it from sagging or getting tangled. You can find all these components individually at marine supply stores or bundled into convenient kits sold by retailers like Bass Pro Shops.
Choosing the Right Kayak Anchor Trolley for Your New Hampshire Adventures
Selecting the perfect anchor trolley system isn't a one-size-fits-all decision, especially when you consider the diverse waterways we have here in New Hampshire. From the gentle currents of a slow-moving river to the often-windy expanse of a large lake, your needs will vary. Making an informed choice now will save you headaches and improve your fishing experience down the line.
Considerations for Different Kayak Types and Water Conditions
First off, consider your kayak. Is it a sit-on-top or a sit-in? Sit-on-top kayaks generally offer easier mounting options for anchor trolleys, as there's more external surface area to attach pad eyes and cleats. Sit-in kayaks can be a bit trickier, sometimes requiring creative mounting solutions or through-hull rigging for the pulleys, though many modern sit-ins are designed with fishing in mind and accommodate trolleys well. The material of your kayak also matters for drilling holes and sealing them properly; polyethylene, ABS, and fiberglass all have slightly different requirements for installation, which we'll get into later.
Next, think about where you typically fish. If you spend most of your time on smaller, calm ponds targeting panfish, a lighter-duty, simpler system might suffice. However, if you venture onto larger lakes like Best Kayak for Winnipesaukee where the wind can pick up quickly and create choppy conditions, you'll want a more robust system with heavier-duty pulleys and a stronger trolley line to withstand the increased strain. For river fishing, especially on faster-moving waters such as the Pemigewasset River or the Connecticut River, a quick-release mechanism on your anchor trolley is not just a convenience, but a vital safety feature. Being able to rapidly disengage your anchor if it snags in strong current can prevent a dangerous situation or even a capsize.
DIY vs. Pre-made Kits: What's Best for You?
When it comes to getting an anchor trolley system, you essentially have two main paths: building it yourself (DIY) or purchasing a pre-made kit. Each has its pros and cons, and your choice will likely depend on your budget, your comfort with tools, and your desire for customization.
A DIY system allows for maximum customization. You can choose every component – the type of line, the specific pulleys, the kind of cleat, and the attachment hardware – to perfectly suit your kayak and fishing style. This can often be a more budget-friendly option, especially if you already have some tools and spare parts lying around. You might source marine-grade rope, stainless steel pulleys, and sturdy pad eyes from a local hardware store or online vendors. However, a DIY approach requires you to understand how all the components work together and have a bit of mechanical inclination. It also means you're responsible for the quality of each part and the integrity of the installation.
Pre-made kits, on the other hand, offer unparalleled convenience. They come with all the necessary components, often designed to work seamlessly together, and include detailed instructions for installation. This is a fantastic option for those who want a reliable system without the guesswork of sourcing individual parts. Many reputable fishing brands offer excellent trolley kits tailored to different kayak models. While generally more expensive than a DIY setup, the peace of mind that comes with a professionally designed and tested system can be well worth the investment. You can find a wide array of these kits, from basic to advanced, at outdoor retailers like Bass Pro Shops or through online platforms like Amazon.
To help you decide, here's a quick comparison:
| Feature | DIY Kayak Anchor Trolley System | Pre-made Kayak Anchor Trolley System |
|---|---|---|
| Cost | Generally lower, especially if you have some parts | Usually higher, but offers convenience |
| Customization | Highly customizable for specific kayak and needs | Limited to kit design, but often well-engineered |
| Components | Sourced individually (rope, pulleys, pad eyes, cleat) | All components included and often matched |
| Installation | Requires more planning and assembly, potential for errors | Clear instructions, usually straightforward assembly |
| Time Investment | More time for research, sourcing, and assembly | Less time, quicker to get on the water |
| Skill Level | Moderate to advanced, basic DIY skills helpful | Beginner to intermediate, good for first-timers |
| Quality Control | Dependent on individual component choices and assembly | Consistent quality within the kit, reputable brands usually |
| Availability | Components often found at hardware stores or online (Amazon) | Readily available from outdoor retailers (Bass Pro Shops, online) |
Essential Features for Safety and Performance
Regardless of whether you go the DIY or pre-made route, certain features are non-negotiable for a safe and effective anchor trolley system. Smooth, snag-free operation is paramount. The trolley line should run freely through the pulleys and along the kayak's side without catching on gear, paddle strokes, or the kayak's features. Any binding can make adjustments difficult, or worse, lead to a dangerous situation if you need to quickly release your anchor.
Easy adjustment and release are also critical. You need to be able to shift your anchor point with minimal effort and, just as importantly, quickly release your anchor line from the system if an emergency arises. This is where a good anchor cleat and a reliable quick-release mechanism on the anchor ring become invaluable. Imagine hooking into a powerful lake trout on Sunapee Lake, only for it to pull your anchor into an underwater snag. If you can't quickly release your anchor, you risk losing both the fish and your kayak, or at least being put in a precarious situation. A well-designed system will allow you to do this smoothly, making your fishing experience safer and more enjoyable. These are the details that separate a good system from a great one when you're out on the water.
Installation Guide: Getting Your Anchor Trolley Setup and Ready
Installing an anchor trolley system on your kayak might seem daunting at first, especially if you're not used to drilling into your beloved boat. However, with careful planning and the right approach, it's a straightforward process that will significantly enhance your fishing capabilities. The key is to take your time, measure twice, and ensure everything is properly sealed to maintain your kayak's integrity.
Planning Your Layout: Front to Back, Port to Starboard
Before you even think about picking up a drill, you need to plan where everything will go. The most common and effective setup for an anchor trolley is a single line running from the bow to the stern along one side of your kayak. This allows you to position your anchor anywhere from the very front to the very back. Most anglers choose the side that allows for easy access to the trolley line with their non-dominant hand while still being able to paddle and fish comfortably. For a right-handed caster, this often means installing the trolley on the left (port) side.
Consider your paddle stroke and any existing accessories on your kayak. You want the trolley line to be out of the way of your paddle, ensuring it won't snag or interfere with your movement. Think about where your fishing rod holders are, your crate, or any other gear. You want a clear path for the trolley line and easy access to the anchor cleat. Some kayaks have existing flush-mount rod holders or accessory tracks that might influence your placement. While a single-sided setup is standard, some experienced anglers opt for a dual-sided trolley or even one that wraps around the bow or stern for specific fishing scenarios, but for most New Hampshire fishing, a single side is perfect for controlling your Best Kayak Fishing Spots in New Hampshire.
Tools and Materials You'll Need
Gathering all your tools and materials before you begin will make the installation process much smoother. For a typical installation, you'll need:
- Drill and appropriate drill bits: Use bits designed for plastic or composite, ensuring they match the size of your hardware screws.
- Marine sealant: This is absolutely critical to prevent water intrusion into your kayak. Silicone or polyurethane marine sealant will work.
- Screwdrivers or socket wrenches: To secure the pad eyes and cleat.
- Measuring tape and marker: For precise placement of components.
- Lighter: To singe the ends of your rope to prevent fraying.
- Gloves: To protect your hands from sealant and potential splinters.
If you're going the DIY route, you'll also need to have all your individual components ready: the trolley line (a sturdy 1/8" to 3/16" braided rope works well), two pulleys, the anchor ring, at least four pad eyes (or more, depending on your kayak's length and design), and your chosen anchor cleat. Remember, you can often find comprehensive kits and individual parts, including high-quality marine sealants, conveniently available on Amazon.
Step-by-Step Installation Process
Once you have everything laid out and ready, you can begin the installation:
- Mark Your Attachment Points: With your kayak on a stable surface, place your pad eyes along the side, spacing them evenly from bow to stern. Ensure they are positioned so the trolley line will run smoothly, slightly above the waterline but clear of your paddle path. Typically, one pad eye near the bow, one near the stern, and one or two in the middle are sufficient to guide the line. Mark the drill points clearly with your marker.
- Drill Pilot Holes: Carefully drill small pilot holes at each marked point. Start with a smaller bit and gradually increase to the final size required by your screws. Ensure you don't drill completely through any internal bulkheads if possible.
- Attach Pulleys and Pad Eyes: Apply a generous amount of marine sealant around each hole and to the underside of each pad eye before screwing them down firmly. The sealant creates a watertight seal, preventing leaks into your kayak. Once the pad eyes are secure, attach a pulley to the bow-most and stern-most pad eyes.
- Install the Anchor Cleat: Choose a convenient location for your anchor cleat, usually within easy reach of your hand in the cockpit, either on the side or just in front of you. Mark, drill, and seal the holes, then secure the cleat.
- Thread the Trolley Line: Create a continuous loop of your trolley line. Thread one end through the bow pulley, then down the length of your kayak through any middle pad eyes, and finally through the stern pulley. Now, tie the two ends of the line together with a strong knot (like a double fisherman's knot or a bowline) to form a complete loop. Before securing the knot permanently, ensure the loop is taut enough to prevent excessive slack but loose enough to run smoothly.
- Add the Anchor Ring: Slip your anchor ring onto the trolley line loop before you finalize the knot that creates the continuous loop, or you'll have to untie it. This ring will then slide freely along the trolley line.
- Test the System: Let the sealant cure according to its instructions. Once dry, attach your anchor line to the anchor ring and deploy your anchor. Practice moving the anchor ring from bow to stern by pulling on the trolley line. Make sure it moves smoothly and that your anchor cleat holds your anchor line securely. Ensure that when you move your anchor point to the bow or stern, the main trolley line doesn't interfere with your paddling or fishing. This system, once properly installed, is incredibly beneficial for all forms of Kayak Fishing Techniques for New Hampshire Lakes.
Disclaimer
This article is for general informational purposes only and does not constitute professional advice. Laws, prices and regulations vary by location and change over time. Consult a qualified professional for guidance on your specific situation.